Widgets
The Huddo Widgets provide the interface for user interaction within Connections. During this step, we will be configuring communities for secure access to the configuration interfaces for Badges and Metrics, as well as provisioning the Analytics widget, Badges/Thanks/Awards Summaries and Leaderboard widgets for end users as well as the Huddo News Gadget.
Create the Configurator Communities
In this step you will create communities for the configurators and/or for administration level analytics. The Configurators can be in one community, a community for each or a mix. We recommend a single community for smaller environments and individual communities for larger ones.
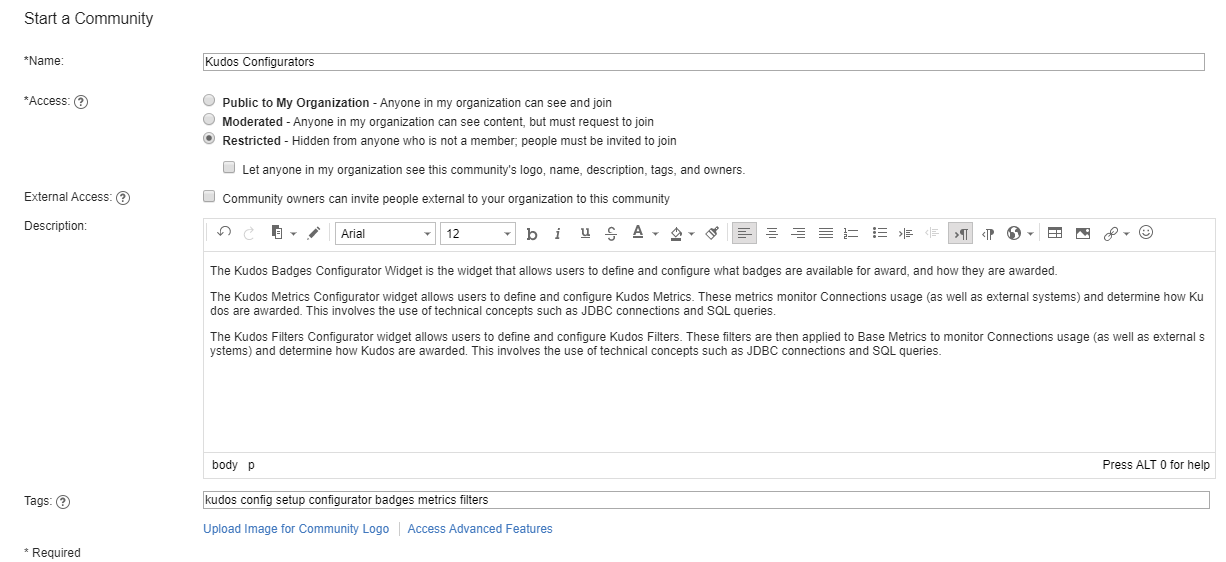
The Huddo Badges Configurator Widget is the widget that allows users to define and configure what badges are available for award, and how they are awarded.
The Huddo Metrics Configurator widget allows users to define and configure Huddo Metrics. These metrics monitor Connections usage (as well as external systems) and determine how Huddo are awarded. This involves the use of technical concepts such as JDBC connections and SQL queries.
The Huddo Filters Configurator widget allows users to define and configure Huddo Filters. These filters are then applied to Base Metrics to monitor Connections usage (as well as external systems) and determine how Huddo are awarded. This involves the use of technical concepts such as JDBC connections and SQL queries.
As such, the Configurators have been designed such that it is available to a specific Connections community where membership can be maintained, and hence the configurators can be secured. The Analytics Interface has been designed with the same concept, which is why the following steps will ask you to create four new communities. For smaller environments, you may wish to have a single community for the Badges, Metrics and Filters configurators.
-
Login to Connections, navigate to Communities and click Create a Community

-
Enter a name, such as Badges Configurator
-
Set Access to Restricted
-
Specify Members as those people you wish to be able to edit Badge definitions. Users can be specified after clicking the Access Advanced Features link.
-
Enter any tags, web address and description you wish then click Save.
Note: Configurators requires a large column community layout to function properly. Either ‘3 Columns with side menu and banner’, ‘3 Columns with side menu’ or ‘2 Columns with side menu’.
You have now created the first Huddo Configurator Community.
Take note of the CommunityUUID in the URL address, as we will need this later.
Please repeat the above steps for the Metrics & Filters communities if you are not using the same Community for these. If you are using the same Community, please move to Create the Huddo Analytics Administrator Community
Create the Huddo Analytics Administrator Community
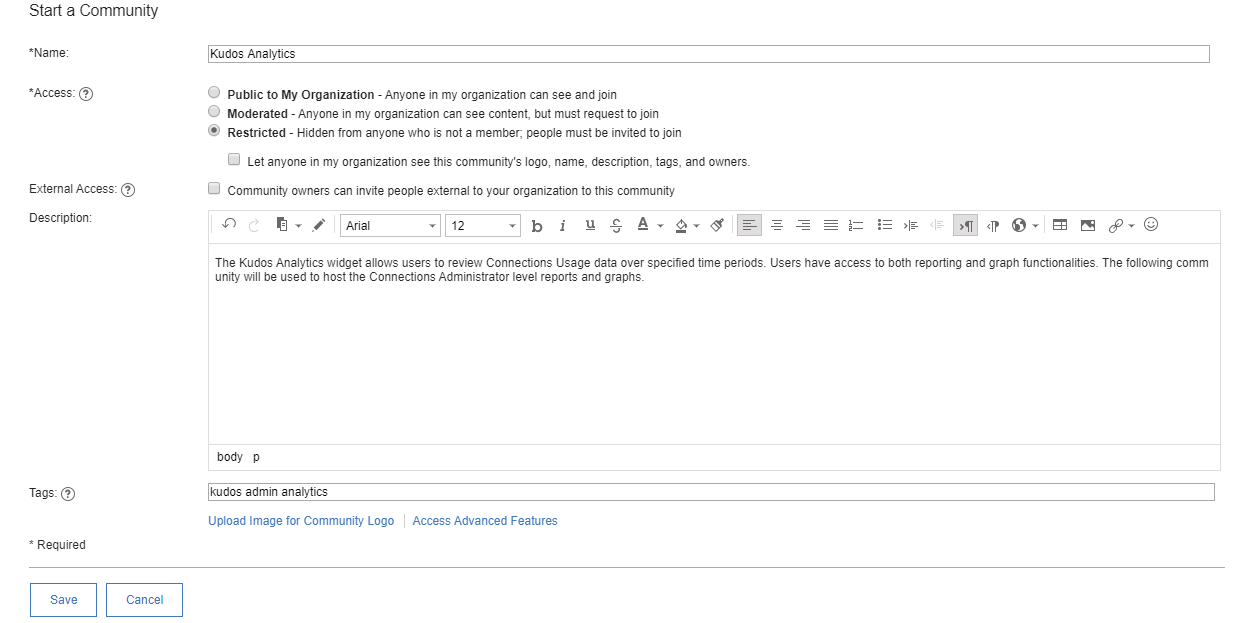
The Huddo Analytics widget allows users to review Connections Usage data over specified time periods. Users have access to both reporting and graph functionalities. The following community will be used to host the Connections Administrator level reports and graphs.
-
Login to Connections, navigate to Communities and click Start a Community.
-
Enter a name, such as Huddo Analytics.
-
Set Access to Restricted.
-
Specify Members as those people you wish to be able to access Connections Administrator level reports and graphs. In Connections 5+, users can be specified after clicking the Access Advanced Features link.
-
Enter any tags, web address and description you wish and click Save.
You have now created the Huddo Analytics Administrator Community.
Take note of the CommunityUUID in the URL address, as we will need this later.
Check out the widgets-config.xml file
To install most of the Widgets you must edit the widgets-config.xml file for Profiles. This file contains the settings for each defined widget. To update this file, you must check the file out and, after making changes, you must check the file back in, as documented in the links below.
The widgets-config.xml file is a standard Connections file that is used to define the configuration settings for each of the widgets supported by Profiles and Communities. To update settings in the file, you must check the file out and, after making changes, you must check the file back during the same wsadmin session as the checkout for the changes to take effect.
Checking Out the Widgets-Config.xml File:
Configure the Profile Widgets
By updating the widgets-config.xml with the code supplied below, the Huddo Badges, Huddo Summary, Profile Progress, Huddo Awards, Award Summary, Huddo Thanks and Thanks Summary widgets will be made available to the end users. The following diagram shows where the widgets will be placed.
Edit the widgets-config.xml file. Find the resource element with the type of profiles, e.g. <resource ... type="profiles" ... >, then under <widgets>, then within <definitions> add the following:
IMPORTANT: Don’t forget to substitute the following placeholders with the corresponding values! CONNECTIONS_SERVER_NAME
<widgetDef defId="HuddoSummary" url="https://CONNECTIONS_SERVER_NAME/Huddo/BadgeSummaryDisplay.xml" modes="view" themes="wpthemeNarrow">
    <itemSet>
        <item name="ProfilesId" value="{resourceId}"/>
    <item name="NumberBadges" value="12"/>
    <item name="BadgeViewAllWidgetId" value="HuddoBadges"/>
    </itemSet>
</widgetDef>
<widgetDef defId="HuddoBadges" url="https://CONNECTIONS_SERVER_NAME/Huddo/BadgeViewAll.xml" modes="view" themes="wpthemeWide">
    <itemSet>
        <item name="ProfilesId" value="{resourceId}"/>
        <item name="NumberBadges" value="0"/>
    </itemSet>
</widgetDef>
<widgetDef defId="ProfileProgress" url="https://CONNECTIONS_SERVER_NAME/Huddo/ProfileProgress.xml" modes="view" themes="wpthemeNarrow">
    <itemSet>
        <item name="ProfilesId" value="{resourceId}"/>
    </itemSet>
</widgetDef>
<widgetDef defId="ThanksSummary" url="https://CONNECTIONS_SERVER_NAME/Huddo/ThanksSummaryDisplay.xml" modes="view" themes="wpthemeNarrow">
    <itemSet>
        <item name="ProfilesId" value="{resourceId}"/>
        <item name="NumberThanks" value="12"/>
        <item name="ThanksWidgetId" value="HuddoThanks"/>
    </itemSet>
</widgetDef>
<widgetDef defId="AwardSummary" url="https://CONNECTIONS_SERVER_NAME/Huddo/AwardSummaryDisplay.xml" modes="view" themes="wpthemeNarrow">
    <itemSet>
        <item name="ProfilesId" value="{resourceId}"/>
        <item name="NumberBadges" value="12"/>
        <item name="AwardViewAllWidgetId" value="HuddoAwards"/>
    </itemSet>
</widgetDef>
<widgetDef defId="HuddoAwards" url="https://CONNECTIONS_SERVER_NAME/Huddo/AwardViewAll.xml" modes="view" themes="wpthemeWide">
    <itemSet>
        <item name="ProfilesId" value="{resourceId}"/>
    </itemSet>
</widgetDef>
<widgetDef defId="HuddoThanks" url="https://CONNECTIONS_SERVER_NAME/Huddo/ThanksViewAll.xml" modes="view" themes="wpthemeWide">
    <itemSet>
        <item name="ProfilesId" value="{resourceId}"/>
    </itemSet>
</widgetDef>
We recommend using absolute URLs in widget-config.xml for reduced configuration complexity. If you have a requirement for the use of relative URLs and are unsure of the implications, you may discuss this with our support team.
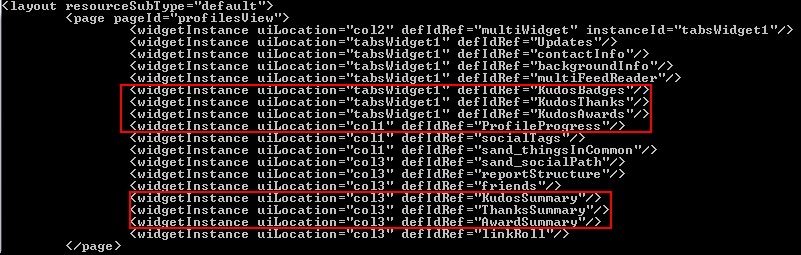
Next you must define where to put the instances of the Widgets on the page. This is achieved by adding the following lines to the widgets-config.xml file in:
Edit the widgets-config.xml file. Find the resource element with the type of community, e.g. <resource ... type="profiles" ... >, then under <layout ... resourceSubType="default" ... >, then within <page ... pageId="profilesView" ... > add the following:
<widgetInstance uiLocation="tabsWidget1" defIdRef="HuddoBadges"/>
<widgetInstance uiLocation="tabsWidget1" defIdRef="HuddoThanks"/>
<widgetInstance uiLocation="tabsWidget1" defIdRef="HuddoAwards"/>
<widgetInstance uiLocation="col1" defIdRef="ProfileProgress"/>
<widgetInstance uiLocation="col3" defIdRef="HuddoSummary"/>
<widgetInstance uiLocation="col3" defIdRef="ThanksSummary"/>
<widgetInstance uiLocation="col3" defIdRef="AwardSummary"/>
The order in which you insert these two instance declarations is the order in which they show on the page. For example, you might wish to show the Summary Tab before the Links widget, and the Huddo Badges, Thanks & Awards Widgets as the last tabs, which would be configured as per the image below. Also make sure that the uiLocation’s match the other ids. If not, then modify to suit your environment.
Configure Configurators and Community Leaderboard Widgets
By updating the widgets-config.xml with the code supplied below, the Badges Configurator, Metrics Configurator, Filters Configurator, Huddo Community Analytics and Huddo Community Leaderboard widgets will be made available. This will allow them to be placed into Connections Communities, as shown in the following image.
You must define the Widgets and where to find their associated .xml files. You will need the CommunityUuids you took note of earlier.
Edit the widgets-config.xml file. Find the resource element with the type of community, e.g. <resource ... type="community" ... >, then under <widgets>, then within <definitions> add the following:
IMPORTANT: Don’t forget to substitute the following placeholders with the corresponding values! YOUR_METRICS_COMMUNITY_UUID, YOUR_BADGES_COMMUNITY_UUID, YOUR_FILTERS_COMMUNITY_UUID , YOUR_ANALYTICS_COMMUNITY_UUID, CONNECTIONS_SERVER_NAME
<widgetDef defId="BadgesConfigurator" description="badgesConfigurator" modes="view fullpage" url="https://CONNECTIONS_SERVER_NAME/Huddo/BadgesConfigurator.xml" themes="wpthemeWide" uniqueInstance="true">
    <itemSet>
        <item name="resourceId" value="{resourceId}"/>
        <item name="communityId" value="YOUR_BADGES_COMMUNITY_UUID"/>
    </itemSet>
</widgetDef>
<widgetDef defId="MetricsConfigurator" description="metricsConfigurator" modes="view fullpage" url="https://CONNECTIONS_SERVER_NAME/Huddo/MetricsConfigurator.xml" themes="wpthemeWide" uniqueInstance="true">
    <itemSet>
        <item name="resourceId" value="{resourceId}"/>
        <item name="communityId" value="YOUR_METRICS_COMMUNITY_UUID"/>
    </itemSet>
</widgetDef>
<widgetDef defId="FiltersConfigurator" description="filtersConfigurator" modes="view fullpage" url="https://CONNECTIONS_SERVER_NAME/Huddo/FiltersConfigurator.xml" themes="wpthemeWide" uniqueInstance="true">
    <itemSet>
        <item name="resourceId" value="{resourceId}"/>
        <item name="communityId" value="YOUR_FILTERS_COMMUNITY_UUID"/>
    </itemSet>
</widgetDef>
<widgetDef defId="HuddoAnalytics" description="HuddoAnalytics" modes="view edit" url="https://CONNECTIONS_SERVER_NAME/Huddo/AnalyticsDashboard.xml" uniqueInstance="false" themes="wpthemeNarrow wpthemeWide wpthemeBanner">
    <itemSet>
        <item name="resourceId" value="{resourceId}"/>
        <item name="adminCommunityId" value="YOUR_ANALYTICS_COMMUNITY_UUID"/>
    </itemSet>
</widgetDef>
<widgetDef defId="HuddoCommunity" modes="view" url="https://CONNECTIONS_SERVER_NAME/Huddo/CommunityRankingDisplay.xml" showInPalette="false" themes="wpthemeNarrow wpthemeWide" uniqueInstance="true">
    <itemSet>
        <item name="communityId" value="{resourceId}"/>
    </itemSet>
</widgetDef>
We recommend using absolute URLs in widget-config.xml for reduced configuration complexity. If you have a requirement for the use of relative URLs and are unsure of the implications, you may discuss this with our support team.
Next you must define where to put the instance of the Community Leaderboard Widget on the Community page. This is done by adding the following lines to the widgets-config.xml file, in:
Edit the widgets-config.xml file. Find the resource element with the type of community, e.g. <resource ... type="community" ... >, then under <layout ... resourceSubType="default" ... >, then within <page ... pageId="communityOverview" ... > add the following:
<widgetInstance uiLocation="col3" defIdRef="HuddoCommunity"/>
Check in the widgets-config.xml file
Now that you have modified the widgets-config.xml, it must be checked back in to Connections. Please refer to the Connections product documentation for instructions on how to check in the widgets-config.xml file, located below.
Checking In the Widgets-Config.xml File:
Register Widgets (Connections 6.0 CR1 onwards)
Since Connections 6.0 CR1 it is now required to register third-party widgets in the widget-container for increased security. We have scripts and instructions for this here.
Add Huddo configuration JSP to the header
(And add ‘Give Thanks’ Link in the navigation bar - Optional)
Perform this task to add Huddo Configuration information to Connections pages and to add a link to the Thanks Awarder widget in the Header Menu as shown
below. You need to perform this step even if you do not wish to add the ‘Give Thanks’ link in order to attach the Huddo Config JSP to the header:
This is achieved by customising the header.jsp file, used for customizing the Connections Navigation bar.
If you have not customised the header.jsp file for your connections environment, please make a copy of the file from:
<WAS_home>/profiles/<profile_name>/installedApps/<cell_name>/Homepage.ear/homepage.war/nav/templates
Paste the copy into the common\nav\templates subdirectory in the customization directory: <installdir>\data\shared\customization\common\nav\templates\header.jsp
Edit the header.jsp file in the customisations directory add the following lines after the Moderation link and before the </ul> HTML tag as shown:
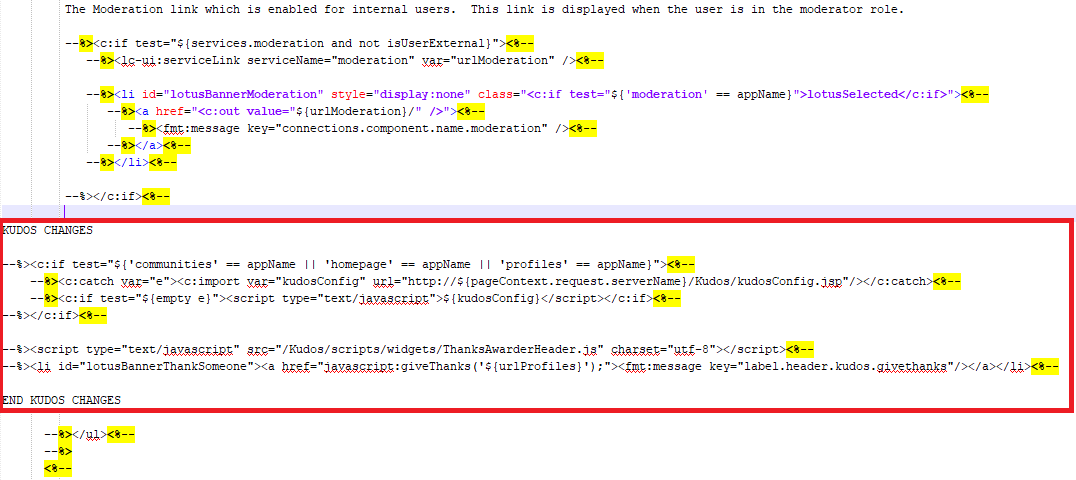
To add the Huddo Config JSP
--%><c:if test="${'communities' == appName || 'homepage' == appName || 'profiles' == appName}"><%--
    --%><c:catch var="e"><c:import var="kudosConfig" url="http://${pageContext.request.serverName}/Kudos/kudosConfig.jsp"/></c:catch><%--
    --%><c:if test="${empty e}"><script type="text/javascript">${kudosConfig}</script></c:if><%--
--%></c:if><%--
To add the Give Thanks link – This step is OPTIONAL
--%><script type="text/javascript" src="/Huddo/scripts/widgets/ThanksAwarderHeader.js" charset="utf-8"></script><%--
--%><li id="lotusBannerThankSomeone"><a href="javascript:giveThanks('${urlProfiles}');"><fmt:message key="label.header.kudos.givethanks"/></a></li><%--
Save and close the file, the changes will take effect when the clusters are restarted. (See next task)
Specify Huddo Analytics Admin Community for Security
This change will not be picked up by Connections until the Huddo Application is restarted. This will be performed at the end of the configuration.
Create the resource.properties file in the Profiles Statistics customisation directory:
<PROFILES_STATS_DIR>/HuddoProperties
Where PROFILES_STATS_DIR is defined by the WebSphere variable:
e.g. /opt/IBM/Connections/data/shared/profiles/statistics/HuddoProperties
Put the following line in the file, replacing <KUDOS_ANALYTICS_ADMIN_COMMUNITY_ID> with the ID of the Huddo Analytics Community created in Task 2.4:
analyticsAdminCommunityID=<KUDOS_ANALYTICS_ADMIN_COMMUNITY_ID>
IMPORTANT: If a file of the same name already exists, merge the contents into the existing file.