Using the Application
The application can be accessed from your HCL Connections site using a URL like
{connections domain}/isw-connections-ccm/, where {connections domain} is the
protocol and domain name of your Connections site.
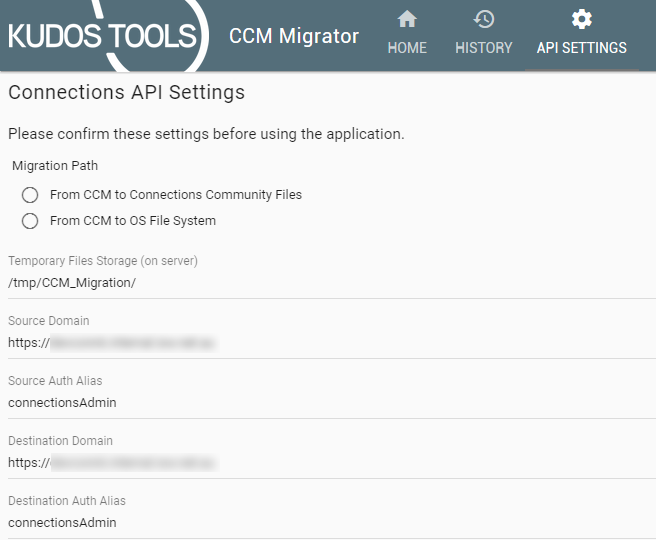
API Settings
On first use, the application loads on its "API Settings" page, and requires settings to be confirmed before it can be used. Most settings have sensible defaults, but some may need to be changed depending on your environment and on how you intend to use the application. Particularly note:
- "Migration Path" has no default and must be set before first use.
- "Logs and Temporary File Path" defaults to a subdirectory of the server's temporary files location (typically "/tmp" on Linux), but you may want to change this. As stated in the Installation document, this location should be synchronized between servers if the application runs on multiple servers in a cluster.
- "Source Domain" and "Destination Domain" must specify the protocol and domain of the Connections environments you're migrating from and to. These default to the domain where the app is installed, which will probably be correct if migrating within a single Connections environment, but you'll need to change at least one of these if migrating between two different environments. "Destination Domain" isn't used and is hidden if migrating to the OS file system.
- "Source Auth Alias" and "Destination Auth Alias" must be the names of J2C authentication aliases defined in the WebSphere ISC (under Security \ Global Security \ J2C authentication data) for your source and destination Connections domains. The aliases must contain credentials for a user with administrative access to Connections, because the app uses these credentials to authenticate with APIs and read/write content. "Destination Auth Alias" isn't used and is hidden if migrating to the OS file system.
- "Output File Path" should be a server file-system location where you want content and metadata exported. If migrating to the OS file system, all content and metadata is exported to this location. If migrating to Connections Files, metadata is exported to this location only if the migration setting to export metadata is enabled.
Other API Settings are described below, but should never need to be changed for normal operation:
- "Number of Threads when building list of folders and files" - Use with caution -
Can cause server CPU starvation and crashes.
The value 1 means that all server-side operations run in a single thread, while higher values (up to a maximum of 4) cause more threads to be used. Higher values should improve performance if all the following conditions are met, but may otherwise cause problems:- Application servers on which this application runs, along with CCM and database servers from which content will be read, have at least as many CPU threads as specified.
- Network connections between servers can handle the additional traffic.
- "HTTP Engine Settings":
- "HTTP Request Handler" - The default value of "Apache HttpClient" should always be best. The "JVM default" option is retained for testing because older versions of CCM Migrator had no other option.
- "Maximum time to wait for data" - HTTP read timeout in milliseconds. The default of -1 means to use an OS-dependent value which we understand to be 1 minute on many platforms. The default should be sufficient, but set it to either 0 (no timeout) or a value higher than 60000 if you observe timeouts occurring.
- "Number of times to attempt each HTTP request" - If set higher than 1 and a server-side HTTP request fails for a temporary reason (e.g. timeout or internal server error), the request will be attempted up to this many times. This setting exists because we observed seemingly-random HTTP request failures in one customer environment, but retries didn't help in that case.
- "Delay before retrying failed HTTP request" - Wait about this many milliseconds before retrying failed HTTP requests. Only has an effect if a HTTP request fails and the previous setting is 2 or higher.
- "Log Settings":
- "Show username in server JVM logs" - Makes messages written by CCM Migrator to the server's "SystemOut.log" and "SystemErr.log" files include the username of the user running Analysis, Migration, or Roll-back. The username is always recorded in CCM Migrator's application log files regardless of this setting.
- "Other Settings":
- "Write XML to file system for CCM library entries" - If enabled, raw XML representing "feeds" of CCM library entries will be written to the configured temporary files location. This setting exists only for debugging.
Once the settings are confirmed by clicking "Confirm Settings" at the bottom of the page, the "Home" page will load. The application saves all settings in the web browser's local storage, so it will remember settings and will load the "Home" page by default on all subsequent use in the same browser, unless local storage is cleared.
Analysis and Migration
On first use before migrating, it's necessary to perform an analysis to build a list of communities. Click "Analyze Communities" to do this.
By default, analysis retrieves the following information for each community:
- Community title;
- Whether the community has any CCM Libraries;
- Whether the community has a Files app (which is the migration target unless migrating to file system);
- The total size of all files in the Files app; and
- The quota and quota usage of the Files app;
With this default behaviour, analysis running time is proportional to the number of communities in your environment. As a rough guide to performance, analysis in an ISW test environment with 270 communities takes about 20 seconds.
The left-hand pane of the "Home" page contains several options under the heading "Migration Settings". Most of these options only apply to migration, but the option "Analysis reads library size" applies to analysis and causes it to also retrieve and display the total size of CCM Libraries in each community. Note this is very slow as it's greatly affected by the number of folders and files in all CCM Libraries. For example in the ISW test environment where analysis takes 20 seconds without this option, it takes about 5 minutes with this option, for a total of about 8000 files.
Once analysis is complete, the list of Communities will be displayed. This includes filtering that defaults to show only Communities valid for migration from CCM to Files.
At this point, you can migrate any number of communities by checking the box next to each Community name and clicking "Migrate Communities", but you should first review the "Migration Settings" in the left-hand pane. The settings are:
- "Test Mode" - Enabled by default. Performing migration with this enabled means that nothing is really migrated, but the migration process will retrieve and display a list of all folders and files in the selected communities. Note that a licence key is required to disable test mode and perform a real migration, and the licence key (if provided to you) must be installed as described in the Installation document.
- "Per-library migration" - If enabled, the communities table allows expanding each community to show libraries in the community, choosing individual libraries to migrate (instead of migrating all libraries in each community), and migrating libraries to subcommunities instead of to the community.
- "Include Tags" - Whether or not to migrate file tags.
- "Include Comments" - Whether or not to migrate file comments.
- "Include Likes" - Whether or not to migrate file likes.
- "Include Follows" - Whether or not to migrate file follows.
- "Include Drafts" - Whether or not to migrate draft files. Note that the Connections Files app doesn't allow drafts, so drafts from CCM will become the latest file version when migrated.
- "Include Versions" - Whether or not to migrate file versions. When enabled, you will also see an option to specify how many versions are migrated.
- "Rename Conflicting Files" - If enabled, and the Files app in a community already
has files matching the name of files being migrated, the migrated files will be
renamed by appending the specified "Filename-Number Separator" followed by a number.
If disabled, files with a conflicting name won't be migrated.
If a migrated folder matches the name of an existing folder in the File app, this option doesn't apply. The migration simply uses the existing folder. - "Replacement for Invalid Characters" - If CCM folder or file names contain characters which aren't permitted in the Connections Files app, those characters are replaced by the specified replacement character.
- "Migrate libraries to folders" - Whether to migrate every library to a separate folder in the target community, regardless of how many libraries exist in the community. By default, CCM Migrator will only create a separate folder for each library if the community has two or more libraries.
- "Export metadata to file-system" - Whether to export extra metadata to the server file-system when migrating to Connections Files. The metadata includes CCM document types and custom fields, which can't be migrated to Connections Files, and is created in the "Output File Path" specified in API Settings. Click here for details of the export file structure.
The "Status Log" provides details while processing. For each community, it lists all Library files (including what folder they belong to) and existing folders in the Files app during an information-gathering phase, then (if Test Mode is disabled) performs the actual migration, listing all files again with an icon and text indicating whether each file was migrated. This log persists after migration, but is cleared if either an analysis is performed or the application is restarted on the server.
Once a Migration run has completed, an entry for each migrated community is added to the "History" page of the application, showing the community title and migration status. A file containing the history is saved under the "Temporary Files Storage" location on the server, and persists unless deleted by some means outside the application.
Regarding file name conflicts
When migrating files, the application makes some attempt to work around file name conflicts. This is particularly worth noting when either:
- One CCM library has files of the same name in different folders; or
- One community has two or more CCM libraries with files of the same name.
HCL Connections Files permits files of the same name in different folders, but doesn't permit a top-level file (not in any folders) to have the same name as a file in a folder.
By default, if CCM Migrator tries to migrate a file and finds that there is already a file of that name in Community Files, it will rename the new migrated file by appending an underscore (_) followed by a number. It will use the number 2 for the first renamed file, increasing the number if the first rename also produces a conflict, and will try up to 20 renames on each conflicting file before giving up. For example, if the file name "My Document.doc" conflicts with an existing Community File, it will be renamed to "My Document_2.doc".
Additionally, for each community, the application checks whether a migration was previously attempted for that community, and avoids repeatedly migrating files which were previously migrated. This means that if a migration of one community was partially successful, but some error prevented completion, the error can be fixed and the migration repeated without having to clear out previously migrated files or producing duplicates. Important: Migrations performed before this functionality was added to CCM Migrator (on 11 Feb 2019) will not be detected, due to the reliance on a new style of system logging.
The application's user-interface provides options to change the above behaviour, and those options are listed earlier in this document.
Roll-back
As of 5 April 2022, CCM Migrator has the ability to roll back migrated communities. Roll-back is only supported when migrating to Connections Files. A file-system migration can be rolled back manually by deleting the export from the server file system.
Perform a roll-back by selecting desired communities and clicking the "Roll-back Communities" button. This will only work for communities which were previously migrated.
If Test Mode is enabled, nothing will be rolled back, and the Status Log will just report the number of files and folders which can be rolled back.
Roll-back only removes files and folders created by migration, and won't remove folders which still contain files or subfolders when the roll-back is otherwise complete.
Roll-back also only works for communities which were migrated after the roll-back functionality was implemented, because it depends on additional data stored in the migration logs on the server. If necessary to roll back an older migration then, as long as the migrated files and folders weren't deleted or moved, simply repeat the migration. This will create a new migration log which contains the required additional data and allows roll-back.