Installation
Log into the WebSphere Integrated Solutions Console (ISC) for your HCL Connections Environment.
Gathering required information
Before starting installation, it's required to know the "JNDI name" for a JDBC data source for the Filenet Object Store database. If you already know this, proceed to Installing the Application for the first time, otherwise review the following.
In the ISC, navigate to Resources \ JDBC \ Data sources.
Determine which data source relates to the Filenet Object Store database, and note the JNDI name for that data source. The image below shows an example where the data source name and JNDI name are "FNOSDS", but it may be different in your environment.
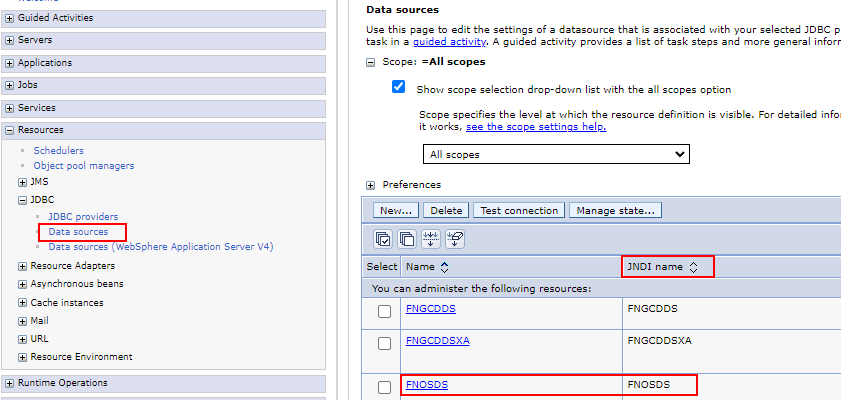
If you're not sure which is the correct data source, check the details of each data source as follows:
- Click a data source name in the data source table.
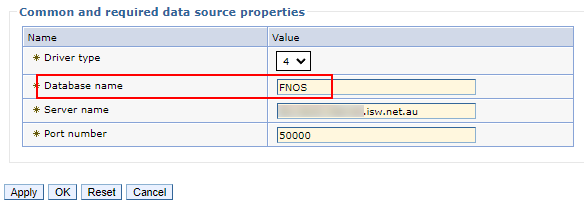
- Check the "Common and required data source properties" for the data source.
- The correct data source should have the database name "FNOS", and a server name matching your Filenet / CCM database server. Once you find this data source, note the JNDI name, and you can then proceed with installation.
If you can't determine the correct JNDI name, the only impact is that CCM Migrator will be unable to migrate file follows, but the installation process requires a JNDI name to be entered regardless.
Installing the Application for the first time
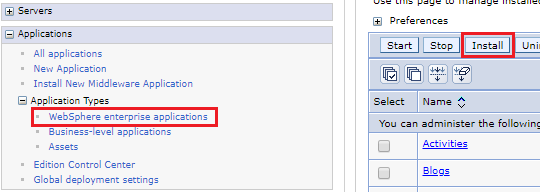
In the ISC, navigate to Applications \ Application Types \ WebSphere enterprise applications and click "Install".
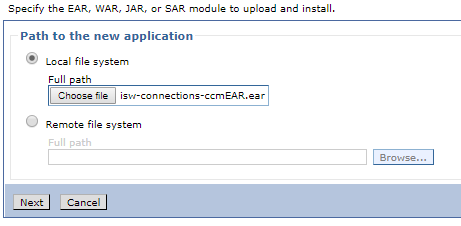
Locate the "isw-connections-ccm.ear" file on your local file system and click "Next".
Select "Fast Path" and click "Next".
Step 1: Leave the default values, update the Application Name if required, and click "Next".
Step 2: Map the module to a single application server or cluster, and at least one web server, then click "Next". Our example uses "UtilCluster" and "WebServer1", but these names may be different in your environment.
Note that after installation and before first use, the application requires users to specify a server file-system location for storing log files. If the application is mapped to a cluster, it's best if the cluster only has one server or the file-system location is synchronized between all servers in the cluster, to ensure that the log files are up to date regardless of which server the application runs on.
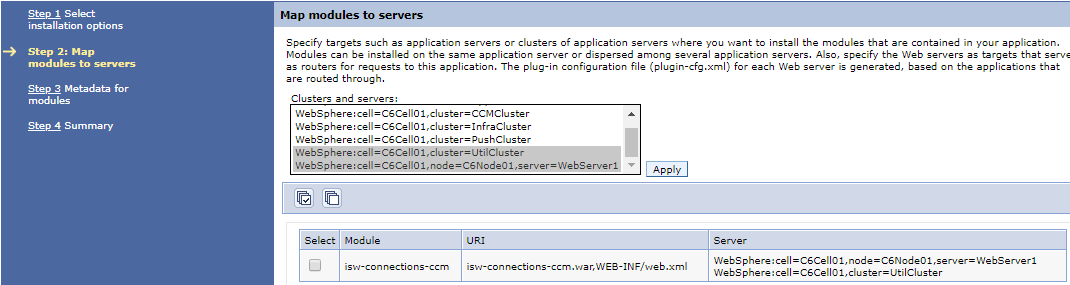
Step 3: Enter the JNDI name for the Filenet Object Store database, which you should have obtained as described under Gathering required information.
Step 4: Leave the default values and click "Next".
Step 5: Check summary and Complete installation.
Save the master configuration once complete.
Updating the Web Server Plug-in
The procedure in this section may or may not be required depending on the configuration of your Connections environment.
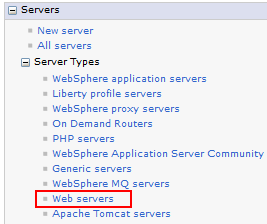
In the ISC, navigate to Servers \ Server types \ Web servers.
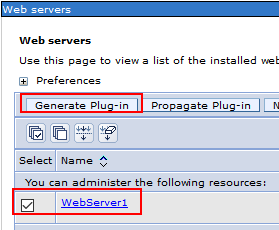
Select the web server, and click "Generate Plug-in". (If your environment has multiple web servers, you should be able to select them all for this step.)
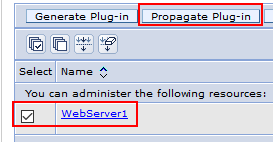
When the above step completes, select the web server again, and click "Propagate Plug-in". (If your environment has multiple web servers, you should be able to select them all for this step.)
Configuring the Application
Licence Key
Without a licence applied, the application can only be used in test mode, where files and folders are reported but not actually migrated.
When requesting a licence you will need to supply:
- The domain name used to access the application in the browser.
- For limited (demo) licences: The community UUIDs that will be allowed to migrate their files.
After receiving your key, you will need to create name space bindings
for CCM Migrator using the exact values provided by the Huddo team.
Please ensure you use the exact case and spelling for the name space bindings as stated below.
All licensed installs require iswCCMLicenceKey.
Limited licences also require iswCCMLicenceCommunities.
| Binding identifier + Name in name space... |
String value |
|---|---|
iswCCMLicenceKey |
Licence key string e.g. A+gAAACsrdTGobh6+PNOTAREALKEYjpVT/6AgMY4SxyOM2ZQ |
iswCCMLicenceCommunities |
Comma delimited list of community ids without white space e.g. 4f4847e3-fdda-4da4-a1b7-2829111a694b,4f4847e3-fdda-4da4-a1b7-2829111a694c,4f4847e3-fdda-4da4-a1b7-2829111a694d |
You may follow the steps below for how to create name space bindings.
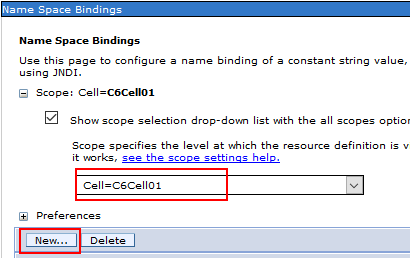
In the ISC, navigate to Environment \ Naming \ Name space bindings.
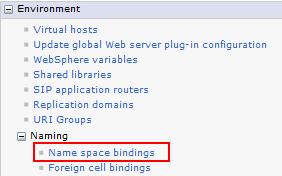
Select the "Cell" scope, then click "New".
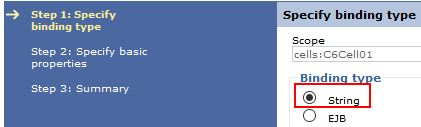
Set the binding type to "String", then click "Next".
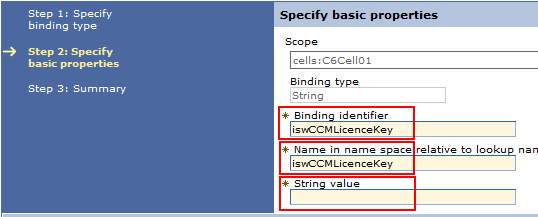
Set both the "Binding identifier" and "Name in name space" fields to "iswCCMLicenceKey". Enter your licence key in the "String value" field.
Click "Next", then click "Finish", then save the master configuration. Repeat these steps for iswCCMLicenceCommunities.
Security
In the ISC, navigate to Applications \ Application Types \ WebSphere enterprise applications, and click the "isw-connections-ccm" application in the list.
Navigate to Configuration \ Detail Properties \ Security role to user/group mapping.
Select the "AdminUsers" role and Map users/groups per your requirements. It is suggested that only one or a small number of users are given access to this application.
Click "OK" and save the changes to the configuration.
Start the application by checking the select box for it from the list and clicking "Start".